
I was not able to be very creative this week due to a crazy work schedule...just incase you may find this post somewhat blah...
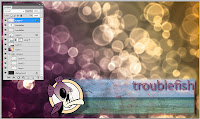
Bokeh, from the Japanese term for haze, is an image (usually in photography) composed of the aesthetic quality of out-of-focus or blurred points of light - i know this is kinda two years ago, but it still creates a simple and pleasant wallpaper...

...i used the colors from my logo, troublefish, for the base colors (and the image is part of my hero graphic from my portfolio site)...
...here we go!
 1.
Create a new transparent document.
1.
Create a new transparent document. This becomes the bokeh brush.
 a. Using the ellipse
tool, create a perfect circle
a. Using the ellipse
tool, create a perfect circle in black in the center of the document.
 b. Select the layer and open up the blending options
 window (click the icon – fx – at the bottom of the
layers window – choose blending options…, or
select: Layer>Layer Styles>Blending Options…).
 c. The blending
options window opens; find the
c. The blending
options window opens; find the Advanced Blending section and move the
opacity slider to 50%.
i.
In the blending
options window,
select Stroke – set size to 12,
position to Inside.
select Stroke – set size to 12,
position to Inside.
ii.
Click OK.


d. Convert the layer into a smart object
(Layer>Smart Objects>Convert to Smart Object).
(Layer>Smart Objects>Convert to Smart Object).

 e. Make it into a brush stroke (Edit>Define
Brush
e. Make it into a brush stroke (Edit>Define
Brush Preset…)– now name it. NOTE: Remember the
number that appears directly below the brush picture
(here it’s 222).
f. Select the brush
tool (Ctrl B) from the tools
menu.
g. Open the brushes
window (Window>Brush).

i. Select the brush
created in the steps above
(either use its number or mouse over for the saved name).
(either use its number or mouse over for the saved name).
ii. Set spacing
to around200%.
 iii. Select Shape
Dynamics and set minimum diameter to 50%.
iii. Select Shape
Dynamics and set minimum diameter to 50%.
iv. Select Scattering
and set scatter
to Both Axes
at 1000%, and count to 4.
at 1000%, and count to 4.
v. Select
Transfer and set Opacity Jitter and
Flow Jitter to 50%.
Flow Jitter to 50%.


h. Save
and close.
2. Create a new document; fill the backdrop with a dark
grey
(i.e. hex# 303030). This is the canvas.

(i.e. hex# 303030). This is the canvas.

3. Return
to the canvas document and create a new layer.
Result: Layer1: grey background | Layer2: color gradient
Result: Layer1: grey background | Layer2: color gradient
 4. Create a diagonal
color gradient across the new layer.
4. Create a diagonal
color gradient across the new layer.
5. Select the color
gradient layer and change its blend
mode
to overlay.

to overlay.

6. Create a new layer group between the
2 layers and set
its blending mode to Color Dodge.
Result: Layer1: grey background |Layer Group 1 |
Layer2: color gradient
its blending mode to Color Dodge.
Result: Layer1: grey background |Layer Group 1 |
Layer2: color gradient

7. In the group create a new layer.
a. Select the brush
tool (Ctrl B) from the tools
menu.
b. Select the created
bokeh brush.
c. Set the brush
size around 300.
d. Set the foreground
color to white.
e. Paint first layer of bokeh.
f. Apply a Gaussian
Blur filter of 10px to the
layer.
g. Set the layer opacity to 60%.
8. In the same group create a second new layer.
a. Select the brush
tool (Ctrl B) from the tools
menu.
b. Select the created
bokeh brush.
c. Set the brush
size around 200.
d. Set the foreground
color to white.
e. Paint second layer of bokeh.
f. Apply a Gaussian
Blur filter of 4px to the layer.
g. Set the layer opacity to 80%.
9. In the same group create a third new layer.
a. Select the brush
tool (Ctrl B) from the tools
menu.
b. Select the created
bokeh brush.
c. Set the brush
size around 100.
d. Set the foreground
color to white.
e. Paint second layer of bokeh.
f. Apply a Gaussian
Blur filter of 2px to the layer.
g. Set the layer opacity to 100%.
10. To enhance the backdrop, add an image or logo.
11. Save
and close.

